
[User interface (UI)] giao diện người dùng (UI) cho Unity
· about 32 mins read- User interface (UI)
- UI Toolkit
- Sử dụng UXML Document như một template (re-use ở nhiều nơi)
- Tạo một Sub-Document như là một Template
- Edit, Unpack một “template instance”
- Thêm Selector vào StyleSheets
- Sử dụng class StyleSheets hoặc Extract inlined Style to New Class trong mỗi Element của Hierarchy
- Sử dụng biến trong USS với “USS variables”
- Instantiate UXML from C# scripts and Find visual elements
- Create a custom control
- Đóng gói các tài liệu UXML bằng logic
- Set up the scene
- Example: MainUI sử dụng thêm UXML cho các phần khác của UI
- Image import settings
- USS transition và Transition events
- Tips:
User interface (UI)
Unity cung cấp 3 hệ thống UI:
- UI Toolkit: là hệ thống UI mới nhất trong Unity. Nó được thiết kế để tối ưu hóa hiệu suất trên các nền tảng và dựa trên các công nghệ web tiêu chuẩn.
- The Unity UI package (uGUI): là hệ thống giao diện người dùng dựa trên GameObject sử dụng Components và Game View để sắp xếp, định vị và tạo style cho giao diện người dùng.
- IMGUI: là một hệ thống GUI điều khiển hoàn toàn bằng code.
uGUI là giải pháp được đề xuất cho những vấn đề sau:
- Giao diện người dùng được định vị và chiếu sáng trong thế giới 3D
- VFX với shaders tùy chỉnh và materials
- Dễ dàng referencing từ MonoBehaviours
UI Toolkit là giải pháp được đề xuất cho những vấn đề sau:
- Tạo ra công việc với số lượng giao diện người dùng đáng kể
- Yêu cầu quy trình soạn thảo quen thuộc dành cho artists và designers
- Tìm kiếm khả năng UI rendering không có kết cấu (textureless)
IMGUI là giải pháp được đề xuất cho (Editor) những vấn đề sau:
- Quyền truy cập không hạn chế vào khả năng mở rộng của trình soạn thảo (Unity Editor)
- Một số control chuyên dụng như TreeView
- API nhẹ để nhanh chóng hiển thị giao diện người dùng trên màn hình
UI Toolkit
Lưu ý: Unity khuyên bạn nên sử dụng UI Toolkit cho các dự án phát triển UI mới của mình. Tuy nhiên, Unity UI (uGUI) và IMGUI phù hợp với một số trường hợp sử dụng nhất định và được yêu cầu để hỗ trợ các dự án không còn được dùng nữa (deprecated projects).
UXML documents: Ngôn ngữ đánh dấu lấy cảm hứng từ HTML và XML xác định cấu trúc của giao diện người dùng và các mẫu giao diện người dùng có thể tái sử dụng. Mặc dù bạn có thể xây dựng giao diện trực tiếp trong tệp C# nhưng Unity khuyên bạn nên sử dụng tài liệu UXML nếu có thể.
Unity Style Sheets (USS): Các biểu định kiểu áp dụng các kiểu và hành vi trực quan cho giao diện người dùng. Chúng tương tự như Cascading Style Sheets (CSS) được sử dụng trên web và hỗ trợ một tập hợp con các thuộc tính CSS tiêu chuẩn. Mặc dù bạn có thể áp dụng kiểu trực tiếp trong tệp C# nhưng Unity khuyên bạn nên sử dụng tệp USS nếu có thể.
Sử dụng các công cụ sau để tạo và gỡ lỗi giao diện của bạn cũng như tìm hiểu cách sử dụng UI Toolkit:
- UI Debugger: Một công cụ chẩn đoán tương tự như chế độ xem gỡ lỗi của trình duyệt web. Sử dụng nó để khám phá hệ thống phân cấp các phần tử và nhận thông tin về cấu trúc UXML cơ bản của nó và các kiểu USS. Bạn có thể tìm thấy nó trong Trình chỉnh sửa trong “Window > UI Toolkit > Debugger”.
- UI Builder: cho phép bạn tạo và chỉnh sửa trực quan các nội dung của Bộ công cụ giao diện người dùng như tệp UXML và USS.
- UI Samples: Thư viện mẫu mã. Window > UI Toolkit > Samples..
Bạn có thể thêm các UI Controls theo những cách sau:
- Sử dụng UI Builder để thêm các UI Controls một cách trực quan
- Sử dụng tệp văn bản giống XML (UXML) để thêm các UI Controls
- Sử dụng tập lệnh C# để thêm các UI Controls
public class MyCustomEditor : EditorWindow // custom Editor
{
    [SerializeField]
    private VisualTreeAsset m_UXMLTree; // là private nhưng thêm [SerializeField] để kéo thả file UXML vào làm reference

    private int m_ClickCount = 0; // lưu và tăng dần mỗi lần button được click

    private const string m_ButtonPrefix = "button"; // sử dụng để tìm Toggle theo Name, quy tắc đặt tên Button và Toggle cần giống nhau theo cách này

    [MenuItem("Window/UI Toolkit/MyCustomEditor")] // vị trí để có thể open 'MyCustomEditor' trong 'Editor'
    public static void ShowExample() // khi click vào menu thì sẽ call hàm này
    {
        MyCustomEditor wnd = GetWindow<MyCustomEditor>(); // trả về một 'EditorWindow' với kiểu là 'MyCustomEditor' là Window này
        wnd.titleContent = new GUIContent("CustomEditor của tôi"); // set title cho nó
    }

    public void CreateGUI() // hàm này được call khi init Window
    {
        // Each editor window contains a root VisualElement object
        VisualElement root = rootVisualElement; // tương đương với 'document' của HTML

        // Các đối tượng VisualElements có thể chứa các VisualElement khác theo hệ thống phân cấp cây.
        VisualElement label = new Label("These controls were created using C# code."); // mỗi Control hoặc 1 nhóm Controls được add vào 1 VisualElement, VisualElement đó được add vào root (document) để hiển thị
        root.Add(label); // Control muốn hiển thị thì phải add vào root (document)

        Button button = new Button();
        button.name = "button3";
        button.text = "This is button3.";
        root.Add(button); // Control muốn hiển thị thì phải add vào root (document)

        Toggle toggle = new Toggle();
        toggle.name = "toggle3"; // quy tắc đặt tên cần giống button để lấy number ở bên dưới
        toggle.label = "Number?";
        root.Add(toggle); // Control muốn hiển thị thì phải add vào root (document)

        // Import UXML sử dụng 'AssetDatabase' (Editor only, Runtime sử dụng "Addressables" hoặc Drag reference trong Inspector thông qua một Script:MonoBehaviour)
        // nếu UXML và USS đặt trong thư mục "Resources" thì có thể sử dụng "Resources.Load". VD: VisualTreeAsset uxml = Resources.Load<VisualTreeAsset>("main_window");
        var visualTree = AssetDatabase.LoadAssetAtPath<VisualTreeAsset>("Assets/Editor/MyCustomEditor.uxml"); // UXML là thể hiện của 'VisualTreeAsset'
        VisualElement labelFromUXML = visualTree.Instantiate(); // tạo 'VisualElement' từ 'VisualTreeAsset' là một nhóm Controls để 'Visual'
        root.Add(labelFromUXML); // add vào root (document)

        root.Add(m_UXMLTree.Instantiate()); // cách viết rút gọn: từ Reference UXML -> tạo 'VisualElement' (Instantiate) -> add vào root

        //Call the event handler
        SetupButtonHandler(); // gọi thủ tục (hàm) để thêm Handler cho các buttons
    }

    // thêm Handler cho các buttons
    private void SetupButtonHandler()
    {
        VisualElement root = rootVisualElement; // 'rootVisualElement' giống 'gameObject', luôn trỏ đến gốc root (document)

        var buttons = root.Query<Button>(); // 'Query' hoặc 'Q', tìm theo tên hoặc tất cả nếu ko nhập tên.
        buttons.ForEach(RegisterHandler); // duyệt tất cả buttons và Handler cho mỗi button
    }
    private void RegisterHandler(Button button)
    {
        button.RegisterCallback<ClickEvent>(PrintClickMessage); // đăng ký Callback khi button được bấm, Callback nhận đối số 'ClickEvent' chứa các thông tin liên quan đến event đó
    }
    private void PrintClickMessage(ClickEvent evt) // Callback được gọi khi button được bấm
    {
        VisualElement root = rootVisualElement; // lấy root reference

        ++m_ClickCount; // tăng bộ đếm

        Button button = evt.currentTarget as Button; // IEventHandler currentTarget
        string buttonNumber = button.name.Substring(m_ButtonPrefix.Length); // Substring để lấy con số tương ứng vì Button và Toggle đặt tên giống nhau
        string toggleName = "toggle" + buttonNumber; // tạo tên Toggle tương ứng với Button
        Toggle toggle = root.Q<Toggle>(toggleName); // truy vấn Toggle theo tên, vì trả về chỉ có 1 Object nên Name của Element phải là DUY NHẤT (không thì sẽ trả về phần tử đầu tiên ???)

        Debug.Log("Button was clicked!" + (toggle.value ? " Count: " + m_ClickCount : "")); // in ra console Log
    }
}
Sử dụng UXML Document như một template (re-use ở nhiều nơi)
Trong UI Builder, kéo file .UXML (Library > Project tab) vào Hierarchy. “Template Instance” xuất hiện trong Hierarchy như một element bình thường và có kiểu là “TemplateContainer”. các properties của ‘internal hierarchy’ này chỉ đọc và chỉ để tham khảo.
Trong UXML sử dụng template sẽ có khai báo giống thế này:
<ui:Template name="ListEntry" src="project://database/Assets/UI/ListEntry.uxml?fileID=9197481963319205126&guid=f511ca1ef59a15b4aa606c94f8049527&type=3#ListEntry" /><ui:Instance template="ListEntry" name="ListEntry" />
Tạo một Sub-Document như là một Template
Trong UI Builder, click chuột phải vào c (một phần UXML hiện tại trong Hierarchy) và chọn “Create Template” > sau khi tạo Template thì Sub-Document trở thành “TemplateContainer”.
<ui:UXML xmlns:ui="UnityEngine.UIElements" xmlns:uie="UnityEditor.UIElements" editor-extension-mode="False">
<ui:Template name="ListEntry" src="project://database/Assets/UI/ListEntry.uxml?fileID=9197481963319205126&guid=f511ca1ef59a15b4aa606c94f8049527&type=3#ListEntry" />
<ui:Template name="background" src="project://database/Assets/UI/Templates/background.uxml?fileID=9197481963319205126&guid=4081ee76a069a0c41a0b2ae2be816d44&type=3#background" />
<Style src="project://database/Assets/UI/MainView.uss?fileID=7433441132597879392&guid=4d46447ce418de347874c3011cf5d723&type=3#MainView" />
<ui:Instance template="background" name="background" />
<ui:Instance template="ListEntry" name="ListEntry" />
</ui:UXML>
Edit, Unpack một “template instance”
- Open in UI Builder: Unload Tài liệu UXML hiện tại và Load Template Instance trong UI Builder:
- Open Instance in Isolation: Giữ Tài liệu UXML hiện tại được tải ở chế độ nền trong khi tải Template Instance. Hệ thống phân cấp và Canvas chỉ hiển thị nội dung của Template Instance và khung StyleSheets bao gồm biểu định kiểu của Tài liệu UXML gốc ở trạng thái chỉ đọc. Điều này là do các biểu định kiểu vẫn đang được áp dụng cho Template Instance:
- Open Instance in Context: Giữ Tài liệu UXML hiện tại được tải trong khi đặt tất cả các thành phần của nó ở chế độ chỉ đọc và xuất hiện mờ trong Hệ thống phân cấp và Canvas. Bạn có thể chỉnh sửa nội dung của Phiên bản mẫu trong ngữ cảnh của Tài liệu UXML gốc. Sử dụng tùy chọn này để cập nhật nội dung Phiên bản mẫu mà không làm mất ngữ cảnh của UXML hiện tại.
- Unpack Instance: nhấp chuột phải vào Phiên bản mẫu và chọn Giải nén phiên bản.
- Unpack Instance Completely: Điều này thay đổi tất cả các Phiên bản mẫu thành Tài liệu UXML thông thường.
Thêm Selector vào StyleSheets
#elementNameOrId (bắt đầu với #)
.styleClassName (bắt đầu với .)
.parentClassName > .directChildClassName
.parentClassName .childClassName (ở bất cứ depth nào)
.styleClassName:hover (pseudo-classes)
.styleClassName:focus (pseudo-classes: active, inactive, selected, disabled...)
Sử dụng class StyleSheets hoặc Extract inlined Style to New Class trong mỗi Element của Hierarchy
Click vào Element trong Hierarchy > trong Inspector tới phần “Style Class List”. Thao tác này sẽ thêm className vào trong Element (giống HTML CSS: class=”w3-btn w3-padding”). Hoặc kéo ClassName từ StyleSheets xuống Element trong Hierarchy.
Sử dụng biến trong USS với “USS variables”
Trong UI Builder không thể tạo USS variables, sử dụng text editor để thêm:
- Để tạo một biến USS, hãy đặt trước tên của nó một dấu gạch ngang kép (–). VD:
--color-1: red; - Để sử dụng giá trị biến USS trong quy tắc USS khác, hãy sử dụng hàm var() để gọi nó. VD:
var(--color-1); - Khi bạn cập nhật một biến, nó sẽ cập nhật tất cả các thuộc tính USS sử dụng biến đó. (tất nhiên)
- Chỉ định giá trị mặc định (Fallback) cho các biến USS nếu không tìm thấy giá trị của biến. VD:
var(--color-1, #FF0000); - USS không hỗ trợ các phép toán trên biến VÀ không hỗ trợ hàm var() bên trong các hàm khác. VD:
background-color: rgb(var(--red), 0, 0); - Trong UI Builder có thể xem được property nào đang sử dụng giá trị biến thì label sẽ được bọc trong 1 box
:root {
  --color-1: blue;
  --color-2: yellow;
}

.paragraph-regular {
  color: var(--color-1);
  background: var(--color-2);
  padding: 2px;
}

.paragraph-reverse {
  color: var(--color-2);
  background: var(--color-1);
  padding: 2px;
}
Instantiate UXML from C# scripts and Find visual elements
Instantiate:
- Trước tiên bạn phải tải tệp vào VisualTreeAsset, sau đó sử dụng Instantiate() để khởi tạo.
- Sau khi UXML được khởi tạo, bạn có thể truy xuất các phần tử cụ thể từ cây trực quan với UQuery (Query / Q)
UQuery được lấy cảm hứng từ JQuery và Linq và được thiết kế để hạn chế việc phân bổ bộ nhớ động. Điều này cho phép hiệu suất tối ưu trên nền tảng di động.
- Để sử dụng UQuery để tìm các phần tử, trước tiên bạn phải tải và khởi tạo UXML, sau đó sử dụng Query hoặc Q để xây dựng các quy tắc selection trên phần tử trực quan gốc.
- Bạn có thể truy vấn các phần tử theo tên, lớp USS hoặc loại phần tử của chúng (Button, Label, VisualElement…). Bạn cũng có thể truy vấn bằng một vị từ hoặc thực hiện các truy vấn phân cấp phức tạp.
Query elements:
- Query(name: “element-name”): có thể bỏ qua ‘name’ vì nó là first argument. VD:
List<VisualElement> result = root.Query("OK").ToList(); - Một số hàm UQueryBuilder có thể sử dụng: .ToList() .First() .AtIndex(1) .Last()
- Query(className: “class-name”): Ví dụ tìm tất cả các element có class “yellow” và gán chúng vào một List:
List<VisualElement> result = root.Query(className: "yellow").ToList(); Query<Type>: VD: VisualElement result = root.Query<Button>().AtIndex(2);- Query with a predicate: VD:
List<VisualElement> result = root.Query(className: "yellow").Where(elem => elem.tooltip == "").ToList(); - Complex hierarchical queries:
VisualElement result = root.Query<Button>(className: "yellow", name: "OK").First(); VisualElement result = root.Query<VisualElement>("container2").Children<Button>("Cancel").First(); root.Query().Where(elem => elem.tooltip == "").ForEach(elem => elem.tooltip="This is a tooltip!"); - Hãy cân nhắc những điều sau khi bạn sử dụng UQuery:
- UQuery duyệt qua hệ thống phân cấp để tìm các phần tử theo tên, lớp hoặc loại. Kết quả bộ đệm từ UQuery khi khởi tạo.
- Nếu bạn cần truy xuất nhiều phần tử, hãy sử dụng cấu trúc QueryState (được trả về bởi phương thức element.Query()) và liệt kê nó để tránh tạo danh sách. Bạn cũng có thể tạo một truy vấn một lần và thực hiện nó trên các phần tử khác nhau.
- UI Toolkit không destroy các visual elements không còn cần thiết, nó sử dụng trình thu gom rác C# để thu thập chúng. Hãy lưu ý để không vô tình giữ lại các tham chiếu đến các visual elements trong một lớp tồn tại lâu hơn UIDocuments hoặc Window nơi chứa các phần tử đó.
- Ghi lại (Capture) các biến VisualElement bên trong các closures.
- Khi bạn tạo hoặc phát hành nhiều phần tử, hãy bật tính năng thu thập rác tăng dần (incremental garbage collection) trong Project Settings để tránh mức tăng đột biến của trình thu gom rác.
Create a custom control
Tạo Class extend “VisualElement” (ko extend built-in UI controls vì nó có thể thay đổi trong tương lai).
Bạn có thể khởi tạo một điều khiển tùy chỉnh trong constructor của nó. Tuy nhiên, nếu ứng dụng của bạn cần, bạn có thể trì hoãn việc khởi chạy cho đến khi điều khiển tùy chỉnh được thêm vào giao diện người dùng. Để thực hiện việc này, hãy đăng ký lệnh gọi lại cho AttachToPanelEvent. Để phát hiện điều khiển tùy chỉnh của bạn đã bị xóa khỏi giao diện người dùng, hãy sử dụng lệnh gọi lại DetachFromPanelEvent.
var myCustomElement = rootVisualElement.Q(className: "my-custom-element");
myCustomElement.RegisterCallback<AttachToPanelEvent>(e =>
    { /* do something here when element is added to UI */ });
myCustomElement.RegisterCallback<DetachFromPanelEvent>(e =>
    { /* do something here when element is removed from UI */ });
Tham khảo thêm Create a custom control
Đóng gói các tài liệu UXML bằng logic
Tách giao diện người dùng khỏi mã trò chơi hoặc ứng dụng của bạn:
- Sử dụng UXML để xác định cấu trúc
- Sử dụng USS để xác định giao diện
- Sử dụng C# để xác định logic của điều khiển.
UXML-first approach
Cách tiếp cận UXML-first sẽ thêm children sau khi xây dựng element.
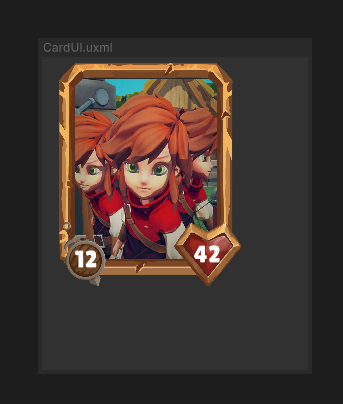
Tạo UXML document (CardElement.uxml)
 <ui:UXML xmlns:ui="UnityEngine.UIElements" xmlns:uie="UnityEditor.UIElements" editor-extension-mode="False">
     <Style src="CardElementUI.uss" />
     <CardElement>
         <ui:VisualElement name="image" />
         <ui:VisualElement name="stats">
             <ui:Label name="attack-badge" class="badge" />
             <ui:Label name="health-badge" class="badge" />
         </ui:VisualElement>
     </CardElement>
 </ui:UXML>
Tạo “custom control class” (CardElement.cs): Lớp điều khiển tùy chỉnh gán giá trị hình ảnh và huy hiệu cho CardElement ở một hàm Init() riêng.
 using UnityEngine;
 using UnityEngine.UIElements;

 // Define the custom control type.
 public class CardElement : VisualElement
 {
     // EXPOSE the custom control to UXML and UI Builder.
     public new class UxmlFactory : UxmlFactory<CardElement> {}

     private VisualElement portraitImage => this.Q("image");
     private Label attackBadge => this.Q<Label>("attack-badge");
     private Label healthBadge => this.Q<Label>("health-badge");

     // Use the Init() approach instead of a constructor because we don't have children yet.
     public void Init(Texture2D image, int health, int attack)
     {
         portraitImage.style.backgroundImage = image;
         attackBadge.text = health;
         healthBadge.text = attack;
     }

     // Custom controls need a DEFAULT constructor.
     public CardElement() {}
 }
Khởi tạo trực tiếp trong C#
 using UnityEngine;
 using UnityEngine.UIElements;

 public class UIManager : MonoBehaviour // Script này sẽ được đính kèm vào
 {
     public void Start() // hoặc OnEnable(): được call khi object được enable hoặc active
     {
         UIDocument document = GetComponent<UIDocument>();

         // Load the UXML document (template) that defines CardElement.
         // It assumes the UXML file (CardElement.uxml) is placed at the "Resources" folder.
         VisualTreeAsset template = Resources.Load<VisualTreeAsset>("CardElement"); // (CardElement.uxml)

         // Create a loop to modify properties and perform interactions for each card.
         // It assumes that you have created a function called `GetCards()` to get all the cards in your game.
         foreach(Card card in GetCards()) // CardData : ScriptableObject với [CreateAssetMenu] ...
         {
             // Instantiate a template container.
             var templateContainer = template.Instantiate();

             // Find the custom element inside the template container.
             var cardElement = templateContainer.Q<CardElement>();

             // Add the custom element into the scene.
             document.rootVisualElement.Add(cardElement);

             // Initialize the card.
             cardElement.Init(card.image, card.health, card.attack);

             // Register an event callback for additional interaction.
             cardElement.RegisterCallback<ClickEvent>(SomeInteraction);
         }
     }

     private void SomeInteraction(ClickEvent evt)
     {
         // Interact with the elements here.
     }
 }
Element-first approach
Cách tiếp cận Element-first sẽ thêm children trong quá trình xây dựng element.
Với tiếp cận này, bạn chỉ bao gồm các phần tử con trong tài liệu UXML phân cấp và sử dụng C# để tải tài liệu UXML phân cấp vào định nghĩa lớp CardElement. Cách tiếp cận này cung cấp cấu trúc giao diện người dùng linh hoạt cho các điều khiển tùy chỉnh. Ví dụ: bạn có thể tải các tài liệu UXML phân cấp khác nhau tùy thuộc vào các điều kiện cụ thể.
- UXML document (CardElement.uxml)
Tạo “custom control class” (CardElement.cs): Lớp điều khiển tùy chỉnh gán giá trị hình ảnh và huy hiệu cho CardElement ở luôn contructor.
 using UnityEngine;
 using UnityEngine.UIElements;

 // Define the custom control type.
 public class CardElement : VisualElement
 {
     // Expose the custom control to UXML and UI Builder.
     public new class UxmlFactory : UxmlFactory<CardElementA> {}

     private VisualElement portraitImage => this.Q("image");
     private Label attackBadge => this.Q<Label>("attack-badge");
     private Label healthBadge => this.Q<Label>("health-badge");


     // Custom controls need a default constructor. This default constructor calls the other constructor in this class.
     public CardElement() {}

     // Define a constructor that loads the UXML document that defines CardElement and assigns an image and badge values.
     public CardElement(Texture2D image, int health, int attack)
     {
         // It assumes the UXML file is called "CardElement.uxml" and is placed at the "Resources" folder.
         var asset = Resources.Load<VisualTreeAsset>("CardElement"); // (CardElement.uxml)
         asset.CloneTree(this); // Build a tree of VisualElements from the asset. Return the root of the tree of VisualElements that was just cloned.

         portraitImage.style.backgroundImage = image;
         attackBadge.text = health.ToString();
         healthBadge.text = attack.ToString();
     }
 }
Khởi tạo bên trong UXML gốc
 <ui:UXML xmlns:ui="UnityEngine.UIElements" xmlns:uie="UnityEditor.UIElements" editor-extension-mode="False">
 <CardElement />
 <CardElement />
 <CardElement />
 </ui:UXML>
Khởi tạo trực tiếp trong C#
 using UnityEngine;
 using UnityEngine.UIElements;

 public class UIManager : MonoBehaviour
 {
     public void Start()
     {
         UIDocument document = GetComponent<UIDocument>();

         // Create a loop to modify properties and perform interactions
         // for each card. It assumes that you have created a function
         // called `GetCards()` to get all the cards in your game.
         foreach(Card card in GetCards())
         {
             var cardElement = new CardElement(card.image, card.health, card.attack);

             // Register an event callback for additional interaction.
             cardElement.RegisterCallback<ClickEvent>(SomeInteraction);

             // Add the custom element into the scene.
             document.rootVisualElement.Add(cardElement);
         }
     }

     private void SomeInteraction(ClickEvent evt)
     {
         // Interact with the elements here.
     }
 }
Set up the scene
GameObject “UIDocument” cần có 2 reference là “source asset” và “script” extend “MonoBehaviour” để add component cho “UIDocument”.
- Tạo UI Document (.uxml) làm UI của game.
- Tạo Script extend “MonoBehaviour” để sử dụng add component
- Tạo một GameObject “UIDocument” trong Scene và thêm UI Document ở bước (1) làm “source asset” và add component là Script ở bước (2).
UI Document (.uxml)
<ui:UXML xmlns:ui="UnityEngine.UIElements" xmlns:uie="UnityEditor.UIElements"
        xsi="http://www.w3.org/2001/XMLSchema-instance" engine="UnityEngine.UIElements" editor="UnityEditor.UIElements"
        noNamespaceSchemaLocation="../UIElementsSchema/UIElements.xsd" editor-extension-mode="False">
    <ui:VisualElement style="flex-grow: 1;">
        <ui:Label text="This is a Label" display-tooltip-when-elided="true"/>
        <ui:Button text="This is a Button" display-tooltip-when-elided="true" name="button"/>
        <ui:Toggle label="Display the counter?" name="toggle"/>
        <ui:TextField picking-mode="Ignore" label="Text Field" text="filler text" name="input-message" />
    </ui:VisualElement>
</ui:UXML>
Script extend “MonoBehaviour”
using UnityEngine;
using UnityEngine.UIElements;

public class SimpleRuntimeUI : MonoBehaviour
{
    private Button _button;
    private Toggle _toggle;

    private int _clickCount;

    //Add logic that interacts with the UI controls in the `OnEnable` methods
    private void OnEnable()
    {
        // The UXML is already instantiated by the UIDocument component
        var uiDocument = GetComponent<UIDocument>();

        _button = uiDocument.rootVisualElement.Q("button") as Button;
        _toggle = uiDocument.rootVisualElement.Q("toggle") as Toggle;

        _button.RegisterCallback<ClickEvent>(PrintClickMessage);

        var _inputFields = uiDocument.rootVisualElement.Q("input-message");
        _inputFields.RegisterCallback<ChangeEvent<string>>(InputMessage);
    }

    private void OnDisable()
    {
        _button.UnregisterCallback<ClickEvent>(PrintClickMessage);
    }

    private void PrintClickMessage(ClickEvent evt)
    {
        ++_clickCount;

        Debug.Log($"{"button"} was clicked!" +
                (_toggle.value ? " Count: " + _clickCount : ""));
    }

    public static void InputMessage(ChangeEvent<string> evt)
    {
        Debug.Log($"{evt.newValue} -> {evt.target}");
    }
}
Example: MainUI sử dụng thêm UXML cho các phần khác của UI
- Tạo MainUI.uxml + MainUI.uss
- Tạo Custom Control: WithAnImageAsset.uxml + WithAnImageAsset.cs : VisualElement
- Tạo MainUI.cs : MonoBehaviour để add Component cho UIDocument. MainUI.cs thực hiện add Custom Control vào rootVisualElement
- Tạo UIDocument và kéo UXML vào Source Asset và add Component là MainUI.cs
MainUI.uxml
<ui:UXML xmlns:ui="UnityEngine.UIElements" xmlns:uie="UnityEditor.UIElements" xsi="http://www.w3.org/2001/XMLSchema-instance" engine="UnityEngine.UIElements" editor="UnityEditor.UIElements" noNamespaceSchemaLocation="../UIElementsSchema/UIElements.xsd" editor-extension-mode="False">
<Style src="project://database/Assets/UI/PositioningTest.uss?fileID=7433441132597879392&guid=b58854dc6d9143c43b21527e4edfaf5c&type=3#PositioningTest" />
<ui:VisualElement class="box" />
<ui:VisualElement class="box" />
<ui:Label text="Relative\nPos\n25, 0" name="relative" />
<ui:VisualElement class="box" />
<ui:VisualElement class="box" />
<ui:Label text="Absolute\nPos\n25, 25" name="absolutePositionElement" />
</ui:UXML>
MainUI.uss
.box {
    height: 70px;
    width: 70px;
    margin-bottom: 2px;
    background-color: gray;
}
#relative{
    width: 70px;
    height: 70px;
    background-color: purple;
    left: 25px;
    margin-bottom: 2px;
    position:relative;
}
#absolutePositionElement{
    left: 25px;
    top: 25px;
    width: 70px;
    height: 70px;
    background-color: black;
    position: absolute;
}
WithAnImageAsset.uxml
<ui:UXML xmlns:ui="UnityEngine.UIElements" xmlns:uie="UnityEditor.UIElements" xsi="http://www.w3.org/2001/XMLSchema-instance" engine="UnityEngine.UIElements" editor="UnityEditor.UIElements" noNamespaceSchemaLocation="../../../../UIElementsSchema/UIElements.xsd" editor-extension-mode="False">
<ui:VisualElement style="position: absolute; top: 0; right: 0;">
<ui:VisualElement name="VElm01" style="height: 200px; background-image: url('project://database/Assets/Backgrounds/4.bmp?fileID=2800000&guid=9a8a37633dcc73540b906cf4ed2b83b1&type=3#4'); -unity-background-scale-mode: scale-and-crop; width: 350px;" />
<ui:VisualElement name="VElm02" style="height: 200px;" />
</ui:VisualElement>
</ui:UXML>
WithAnImageAsset.cs
using UnityEditor;
using UnityEngine;
using UnityEngine.UIElements;

public class WithAnImageAsset : VisualElement
{
    public WithAnImageAsset() // default ctor
    {
        //Init(); // chuyển qua sử dụng AttachToPanelEvent / DetachFromPanelEvent
    }

    public new class UxmlFactory : UxmlFactory<WithAnImageAsset> {} // expose

    public void Init()
    {
        // AssetDatabase thuộc namespace UnityEditor
        var uxmlTemplate = AssetDatabase.LoadAssetAtPath<VisualTreeAsset>("Assets/UI/SetBackgroundImages/WithAnImageAsset/WithAnImageAsset.uxml");
        uxmlTemplate.CloneTree(this);
        SetBG();
    }
    void SetBG()
    {
        var VElm02 = this.Q<VisualElement>("VElm02");
        //VElm02.style.width = 350; // trong UXML đã khai báo
        //VElm02.style.height = 200;

        // AssetDatabase.LoadAssetAtPath cần full path kể cả 'Assets/.../*.jpg'
        //var bg = AssetDatabase.LoadAssetAtPath<Texture2D>("Assets/Backgrounds/3.jpg");

        // Resources.Load tính từ Assets/Resources, ko bao gồm Resources và phần mở rộng của file
        var bg = Resources.Load<Texture2D>("Backgrounds/1");
        Debug.Log(bg);

        VElm02.style.backgroundImage = bg;
    }
}
MainUI.cs
using UnityEngine;
using UnityEngine.UIElements;

public class MainUI : MonoBehaviour
{
    //[SerializeField] private VisualTreeAsset secondVElm;
    //[SerializeField] private VisualTreeAsset thirdVElm;
    void OnEnable()
    {
        var uiDoc = GetComponent<UIDocument>();
        var withAnImageAsset = new WithAnImageAsset();
        // WithAnImageAsset không khởi tạo ở Contructor nên đăng ký event này để call Init()
        withAnImageAsset.RegisterCallback<AttachToPanelEvent>(e => {
            Debug.Log(e);
            withAnImageAsset.Init();
            withAnImageAsset.style.position = Position.Absolute;
            withAnImageAsset.style.top = 0;
            withAnImageAsset.style.right = 0;
        });
        uiDoc.rootVisualElement.Add(withAnImageAsset);
    }
}
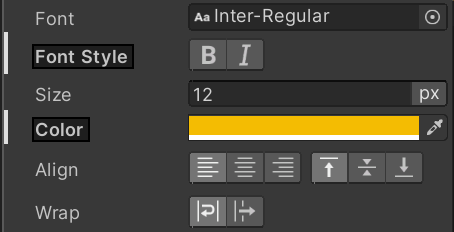
Image import settings
Sau khi bạn đã nhập hình ảnh vào dự án của mình, để có kết quả trực quan nhất, bạn nên áp dụng một số cài đặt nhập nhất định cho Textures, Sprites, and Vector trước khi bạn sử dụng chúng làm nền cho thành phần trực quan trong giao diện người dùng Người xây dựng.
USS transition và Transition events
USS transition thay đổi giá trị thuộc tính trong một khoảng thời gian nhất định (tương tự như CSS transition), sử dụng để thực hiện các animation cho UI.
Transition events thông báo cho bạn về những thay đổi trong trạng thái của quá trình chuyển đổi.
Xem thêm Transition events ở đây
Tips:
- Load UXML sẽ được object kiểu “VisualTreeAsset” => cần .Instantiate() để được “VisualElement”
- “rootVisualElement” là một “VisualElement”, giống “gameObject” luôn có sẵn và reference đển TOP-Element (giống “document” của HTML)
- “Custom Control” gồm UXML + Script C# extend “VisualElement” (CloneTree(this)), Script C# cần “EXPOSE to UXML and UI Builder” và cần có “DEFAULT constructor”. Script C# đại diện UXML để sử dụng trong coding (gán giá trị cần thiết ở Contructor hoặc Init khi thích hợp).
- UXML đại diện luôn là “VisualTreeAsset” kể cả có reference bằng kéo thả ([SerializeField])
- sử dụng uxmlModal.CloneTree(this) thì không cần Instantiate() đã có luôn VisualElement cho “this”
- các UIDocument chung panelSettings có “rootVisualElement” riêng, “rootVisualElement” từ UIDocument không phải là “panelSettings”